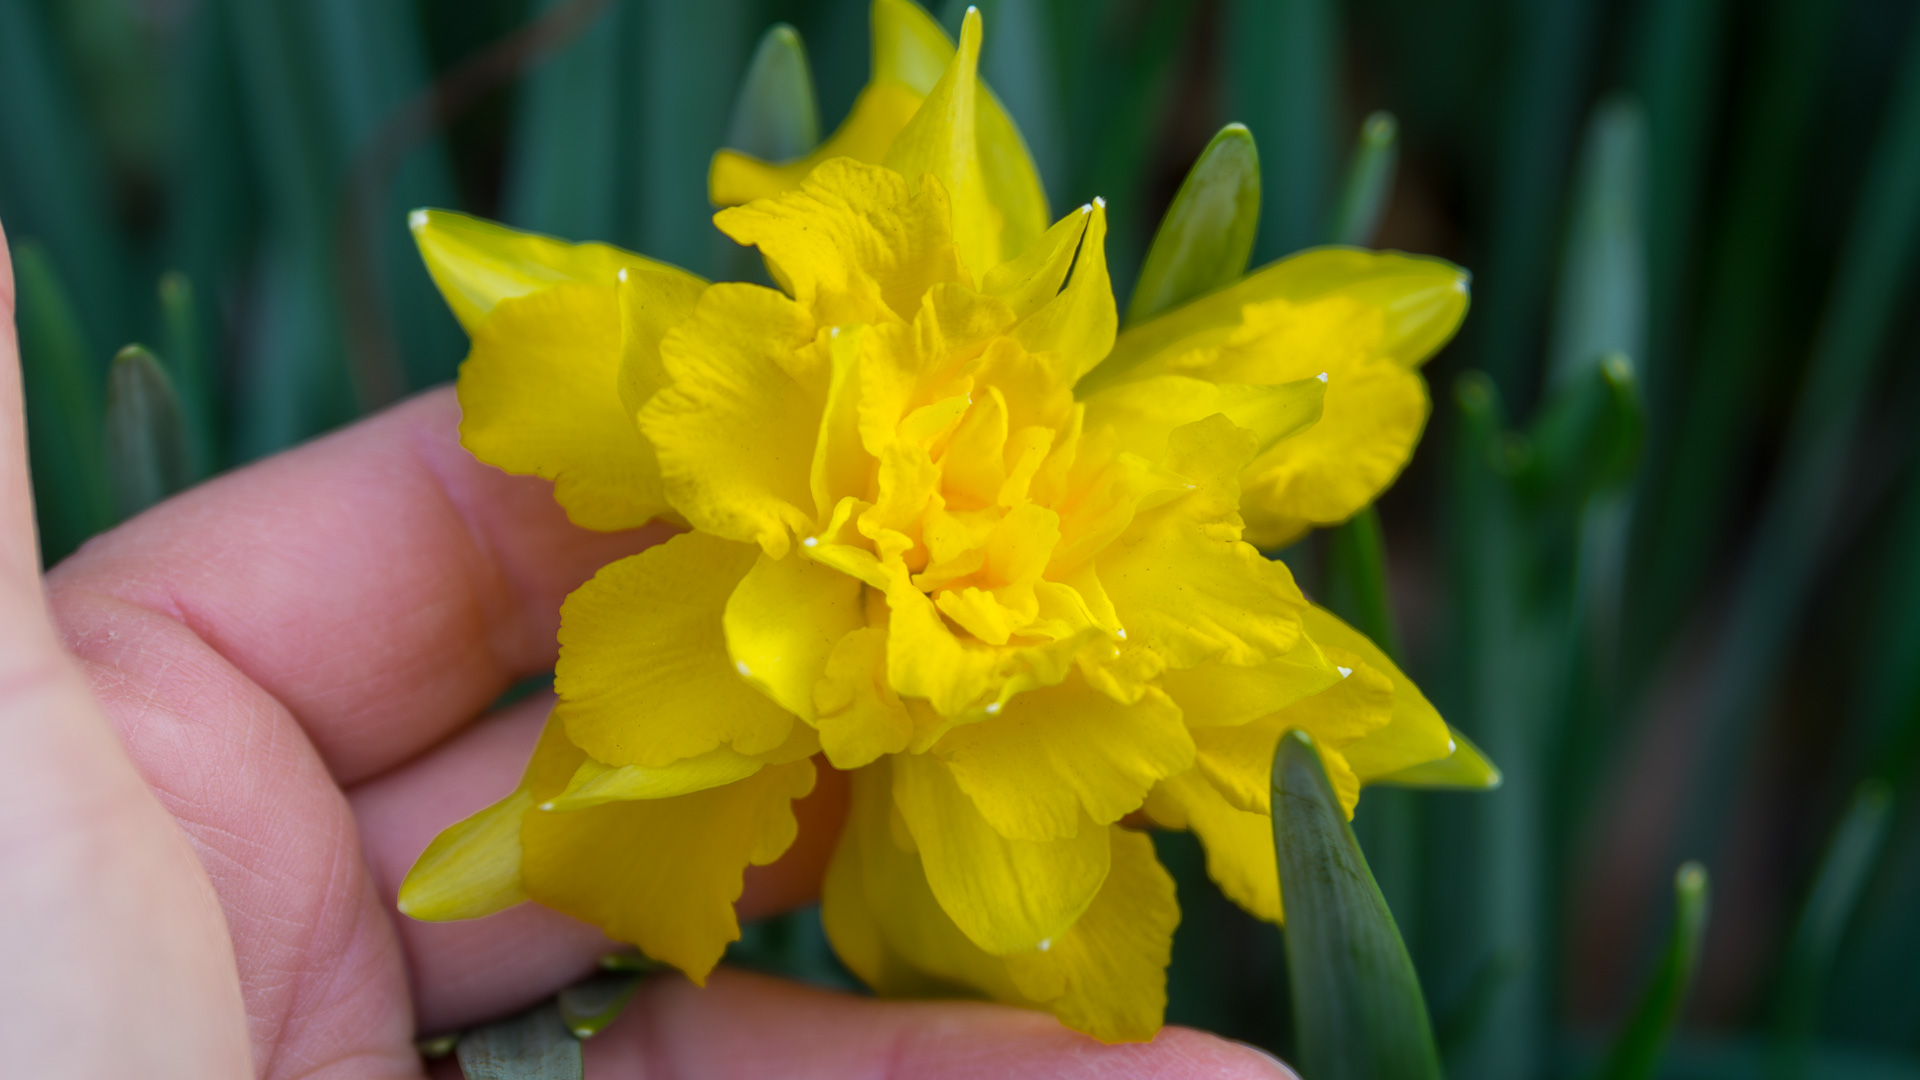
It’s mid-March, and my snow crocus has bloomed for a few weeks. What’s the secret to such early spring flowers? How do I pull off such a fantastic feat every year?
Simple. I do nothing!
Snow crocus is one of the first bulbs, technically, it’s a corm, to bloom in the landscape.
Crocus is extremely easy to care for. They showed up in the lawn about ten years ago and return a little thicker yearly. I neither planted the crocus nor did a thing to care for them.
In particular, the crocus I have are Crocustommasinianus, commonly called the snow crocus or early crocus. Snow crocus has lavender flowers and is the first bloom in the spring.
In fact, Snow crocus often blooms while snow is on the ground. Another identifying factor of snow crocus, Crocustommasinianus, is white stems.
Snow crocus or early crocus grow as far north as USDA Hardiness Zone 3 and south to USDA Hardiness Zone 8. Snow crocus is not a native plant.
Moreover, the snow crocus was covered in snow last week. They were in bloom before the snow fell and are still in color after the snow has melted.
It should be noted that Snow crocus grow three to four inches tall. I mow at a minimum of three inches, so there is plenty of foliage left to feed the corms after bloom.
Consider planting snow crocus in your lawn or garden if you want early spring bloom. You won’t regret it.
This morning I stepped outside for a breath of air and caught an Oakleaf Hydrangea (Hydrangea quercifolia) glowing in the warmth of the morning sun.
Oakleaf Hydrangeas are one of my favorite plants for several reasons.
First, the oak-shaped leaves create interest in the landscape all year.
Second, mid-summer blooms light up the landscape and persist until frost.
Third, the fall color of Oakleaf Hydrangeas is outstanding with glowing shades of oranges and reds.
Fourth, Oakleaf Hydrangeas are reasonably slow growers and seldom outgrow their space.
Fifth, Oakleaf Hydrangeas thrive in both sun and partial shade and tolerate dry conditions. If you need a 3-5 foot tall shrub for the shade garden think Oakleaf Hydrangea.
There are only two minor downsides to Oakleaf Hydrangeas I can think of.
First, Oakleaf Hydrangeas can be finicky when it comes to pruning.
Oakleaf Hydrangeas bloom on the previous season’s growth. If you prune them too early you risk removing the current year’s blooms and if you prune them too late you risk removing the next year’s blooms.
The winter habit of an Oakleaf Hydrangea below reveals you don’t have a lot to work with when it comes to pruning.
I’ve tried pruning Oakleaf Hydrangea both early and late with limited success.
I accept that if I prune more than a branch or two on an Oakleaf Hydrangea I may not get blooms this season or next season.
If I need to do a major pruning on an Oakleaf Hydrangea I prune immediately after bloom and still, I often lose out on most flowers the next year.
Second, some Oakleaf Hydrangeas, survive but don’t thrive. Like the one in this picture.
Admittedly, this plant is in dry, deep shade and that the shrub is growing at all is a miracle. However, I’m lucky to have a flower or two on this four-foot-tall shrub.
The interesting foliage, fall color and survivability are worth tolerating an Oakleaf Hydrangea with few or no flowers in my book.
My favorite cultivar of Oakleaf Hydrangea is Ruby Slippers. Watch the video below starting at 25:35 for why I love Ruby Slipper Oakleaf Hydrangea. I haven’t pruned this Ruby Slippers Hydrangea besides deadheading and the occasional branch or two for years.
Less is more when it comes to pruning Oakleaf Hydrangeas. Consider if you need to prune at all besides dead heading.
Below is a high-resolution image of my oakleaf hydrangea glowing in the morning sun. Click on the image to open it in a new tab.
I had a meeting with a prospective client yesterday to discuss a design for the front of their home.
When I drove up their driveway one thought came to my mind.
This the most challenging space I will ever design.
I stepped out of my car looked at the landscape and the ideas started to flow. I couldn’t stop them.
How to hide an outlet in the middle of a landscape?Surround the outlet with impatiens and make the flowers a focal point. I get a lot of compliments on the pretty pink flowers, everyone thinks I planted the flowers there because they look pretty, not to hide the outlet.
Luckily, this landscape reminded me that I have a special set of skills.
This garden started as a square foot garden. Then I found this cool wire arch that fit between the beds perfectly. I added a hummingbird feeder and hummingbird-friendly plants. Every morning the hummingbird feeds and rests by wrapping its little feet around the wire of the arch.
After spending my life consciously, and subconsciously, learning plants, analyzing landscape and learning from my work I’m able to solve problems many cannot.
Please don’t mulch trees like this. Please don’t mulch trees like this. Please don’t mulch trees like this. Please don’t mulch trees like this. Please don’t mulch trees like this. Please don’t mulch trees like this. Please don’t mulch trees like this.
The truth of the matter is I don’t expect you to solve landscaping problems if you don’t have the time or the interest. That’s what I’m here for.
The number one tip on how to have a nicer lawn is to mow your lawn higher. A lot higher. A second tip is to make sure you have a sharp blade. These two tips will make a greater difference than any chemicals or irrigation system.
Just as a plumber solves problems with plumbing, a lawyer solves problems with the law and my wife solves the problem of where the Cheddar Cheese Sticks are.
I solve the problem of how to design and maintain your landscape.
A couple of weeks ago I performed a spring seeding of my lawn and would like to share some spring seeding tips. My goal was to fill bare spots and overseed my dog’s run. Overseeding the run is most likely a waste of time but I had to give it a try.
I live in USDA Hardiness Zone 6 where we grow cool-season grass. In a nutshell, cool-season grass goes dormant in the winter when temperatures are cold and over the summer when temperatures are hot.
My goal is to complete spring overseeding as early as possible. Definitely before forsythia bloom. If there are a few warm days at the end of winter and the ground isn’t muddy I take advantage of the opportunity to overseed thin spots.
The ideal time to plant cool-season grass is late August to September when temperatures are cool and rainfall abundant. I don’t plant new lawns in the spring unless absolutely necessary. However, spring overseeding and filling bare spots is acceptable.
The first thing I did was run my Aerovator over the bare areas. If you don’t have an Aerovator you can rent an aerator or use a metal rake to roughen the soil. Grass seed wants to grow and if kept moist it will.
The Aerovator has solid tines, unlike an aerator’s hollow tines, which penetrate the soil and vibrate.
Again, you don’t need an Aerovator to do the job but once you see the results you’ll be amazed. The machine leaves the lawn spongy soft with holes that allow air, water, nutrients and seed to enter.
While the Aerovator is an aggressive machine, you can control the amount it disturbs the soil. However, if there is no grass cover, like my dog’s run, the results are very similar to using a tiller.
Once I aerovated the lawn I generously spread Lesco Shady Select Grass Seed. I have a lot of sugar maples that provide plenty of shade.
Most cool-season grass seed mixes contain bluegrass, fescue and ryegrass. If you have shade you want a seed mix with more fescue. The amount of fescue in this seed mix is off the charts! I can’t wait to see how it does.
When seeding I always go heavy. Clients like to see grass as soon as possible and I like to grow grass as thick as possible.
I used the back of a bamboo rake to incorporate the seed into the soil. While I know every tutorial ever written on planting grass says to do this I admit I often skip this step and the seed does wonderfully. Again, the secret to growing grass is to keep the seed moist.
Finally, I top-dressed the area with a light coating of compost. I would say the compost is 1/8 to 1/4 inch thick.
I selected well-aged compost with little debris. I picked some debris out while shoveling the compost into the wheelbarrow.
Once finished composting I walked away and didn’t water once. It’s been a relatively warm, yet dry, spring and I’m happy to say after two and a half weeks there’s a green fuzz in the backyard. We did get a couple of rainstorms.
I would have better results if I watered the new seed, and you will too, but it’s early enough that mother nature will do most of the work. Seeing the seedlings motivated me to start watering though it’s supposed to rain the next couple of days.
As you can see above seeding my dog’s run was an exercise in futility. However, if you use these spring seeding tips in your yard you’ll have great results.
Some landscaping practices should be avoided. Below are my top three landscaping pet peeves.
Tags left on Plants
Why would anyone leave plant tags fluttering in the wind? Leaving tags on plants takes a beautiful landscape and makes it look like the side of the highway. Please remove all tags before leaving the job.
I occasionally leave a tag on a new plant, at my house, so I can remember what I planted or learn a plant’s name. However, if you’re bringing a plant to someone’s house either know what it is or keep a list of what you planted.
A great way to practice plant identification is to walk through a newly installed commercial landscape. Guess what the tree or shrub is and check the tag to see if you got it right!
Landscape Fabric
There’s never a reason to install landscape fabric under mulch.
In a few years, the mulch will break down and weeds will grow into the fabric becoming a headache to remove. In ten to fifteen years, when it’s time to redo the landscape, someone will suffer while ripping the fabric out. If you’ve never ripped out landscape fabric I assure you it’s no fun.
There’s never a reason to install landscape fabric under gravel either.
Dirt settles in gravel and creates the perfect seedbed for weeds. Weed roots anchor to landscape fabric under gravel the same as under mulch. It’s more of a hassle than it’s worth.
Volcano Mulching
Trees are not supposed to look like a fountain of lava shooting out of the top of a volcano. If you leave mulch against the base of a tree you’re doing more harm than good.
A properly mulched tree should have, at most, two to three inches of mulch tapering down six inches or more away from the tree.
Please stop the volcano mulching madness.
If you’re new to landscaping please heed the pet peeves on this page so your landscape doesn’t suffer.
This spring I visited a home that had recently been mulched and was shocked at how deep the mulch was and how little preparation went into the job.
Weeds that had been covered in mulch poked through and the mulch was easily four to five inches deep.
I recommend carrying a soil knife and removing perennial weeds, such as Dandelion, down to the root before mulching.
This garden should not have been mulched; the time and expense should have gone into weeding.
Deep mulch leads to unhealthy plants and looks unnatural. On some jobs, I have to remove deep, old mulch before applying new.
Once a garden is established an inch of mulch is all you need.
Benefits of light mulching include:
Mulch won’t require yearly turning.
Oxygen can easily enter the soil.
Mulched over tree bark won’t become an entry point for insects, disease, and rodents.
Water easily filters through.
Less mulch looks more natural, like a coating of leaves on the forest floor.
Plant roots grow into the soil instead of growing into mulch that quickly dries.
Whether you’re a contractor or a homeowner try not applying mulch one year and see the difference it makes. Your plants will be healthier with significantly less work and expense.
Below is a landscape I mulched this spring by applying just enough mulch to do the job. No more. No less.
Spread less mulch for a more healthy landscape and sometimes you don’t need to add any mulch at all.
Every spring I cringe when I see freshly mulched landscapes. The more is better principle gets beaten silly and mulch spread with reckless abandon.
This isn’t the first time I’ve discussed how to mulch and it won’t be the last. How to mulch correctly is a topic worth repeating.
Volcano mulching is when a mound of mulch is spread around the base of a tree (See photo top of page). The cone grows yearly with each new layer. The sooner we can stop volcano mulching the better.
Below a tree thrives in the forest with no volcano mulching ‘help’ from man. There’s moss growing at the base of the tree because leaves only begin to cover the ground six inches away.
Mimic how mother nature mulches. She doesn’t dump piles of leaves against the base of trees. She spreads a light coating of leaves over the entire forest.
Why is this so hard to understand?
The illustration below shows how to mulch a tree incorrectly by volcano mulching. Mulch spread against the bark creates a moist place that encourages rot. Further, tree roots grow into the mulch making them drought prone. Finally, the mulch is so deep rain runs off and doesn’t reach the roots.
The illustration below shows how to mulch a tree correctly by spreading 2-3 inches or less of mulch 6-12 inches from the trunk of the tree. Mulch doesn’t touch the trunk.
If a tree has over 3 inches of mulch carefully remove it without injuring the bark or roots of the tree.
How to Mulch a Tree Correctly Samples
Below a tree I mulched last year has some dirt and moss around the base of the tree. It would be a shame to slowly kill this beautiful tree by over-mulching.
Another tree mulched the right way. You can see dirt at the base of the tree and that’s good. A few weeds may grow but it’s worth the effort.
How to Mulch a Tree Incorrectly Samples
I often see trees so over mulched you could mulch several more trees with the excess. I’m not kidding!
More volcano mulching. It doesn’t look natural and it’s no good for the tree. The madness has to stop!
Same look, different parking lot.
A beautiful oak tree sentenced to a slow and painful death.
Why would someone do this? I can’t make this stuff up.
After three days of hard work I’m almost finished preparing a garden bed. It was a hard-fought victory that taught me tips for getting work done.
We’ve had a mild winter and I looked forward to working with the temperature in the 50’s and 60’s. Last week the weather changed. It’s been in the low 40’s with overcast skies and showers.
The first thing I do when I arrive at a job is formulate a plan to get the work done.
First, I removed six yards of mulch from around a Japanese Maple (Acer palmatum sp.) and the landscape fabric underneath. There was too much mulch around the tree.
There was over six inches of mulch under the Japanese Maple (Acer palmatum sp.) along with landscape fabric. The mulch and the landscape fabric had to go for the health of the tree.
Removing excess mulch around the Japanese Maple (Acer palmatum sp.).
The only place to get rid of the mulch was off the property. That meant loading a wheelbarrow and pushing it up a 15 foot slope to my truck about 40 yards away.
Did I mention this was my first job of the season? My body is nowhere near conditioned yet.
This afternoon as I finished for the day the sun broke through the clouds. It was like the heavens opened up and said, “Attaboy John!”
In a weird twist of fate the sun broke through the clouds as I was finishing for the day. The line through the bed is a future stepping stone path.
Tips for getting work done
Get started. Even if you don’t have a plan for how to do the work. When you start a plan will form in your mind. I’m talking about a plan to complete the work, not a landscape design.
Congratulate yourself for getting started. If you the type of person, like me, who occasionally over thinks things don’t beat yourself up for lost time.
Enjoy the work. I enjoy good “clean” hard work. Digging, mulching, splitting wood, etc. I feel energized, albeit exhausted, after a days work.
Break the job into manageable pieces. I set a goal for each day. My first day on most jobs the goal is to get to the job and get started. Once I’m working a plan will form (See step 1). The second day my goal was to clean up the mulch under the Japanese Maple. The third day my goal was to finish preparing the bed. By the third day I gained momentum and prepared another bed.
Take a break if you need one. Nothing saps productivity like rushing through a job or stressing about a deadline. It may seem counter productive but you’ll notice big dividends from a break.
Wear comfortable shoes. A landscaper is only as good as his or her footwear. If your shoes are heavy you’ll move slowly. If your feet are wet your day will be miserable. Some days I bring a couple pair of shoes and a heavy and light weight sweatshirt. The first two days I wore heavy insulated steel toe boots. When the sun broke I put my lightweight Muck Boots on and felt like I could fly. I wear the lightest shoes I can. The exception is when I need steel toes for safety.
Given the choice I prefer my lighter and more comfortable muck boots.
You started the job. You’re going to finish it. That’s all that matters.
I hope these tips for getting work done will help you get through your next job. Get out there and have fun!
The end of the 2013 CT landscaping season is here. Below are some tips to prepare your home and landscape for winter.
In the Landscape
Cut back perennials to prevent the overwintering of insects and disease. Cut most perennials to the ground. Some perennials, such as coral bells, should not. It’s better to post a question below than to cut prematurely.
Cut ornamental grasses 3-6 inches from the ground either now or in late winter. Here in CT I cut ornamental grasses in the fall, they tend to get beat up and look ratty through the winter.
If you have tree hydrangeas (Hydrangea paniculata) it’s OK to prune them once the leaves fall off. Tree hydrangeas flower on the current seasons growth. They will bloom next year if pruned this winter. If you have bigleaf hydrangeas (Hydrangea macrophylla) only cut spent flowers to clean up the shrub, otherwise you’ll be removing next years blooms.
Household Maintenance
Turn off the valves to your hoses on the inside of the house and then open the valves on the outside to drain water. Once the water drains close them again to prevent accidentally running water all winter if someone turns the wrong valve. Disconnect and roll up your hoses on a warm day to flush all water from them. Bring hoses indoors for longest life. You can keep them coiled, without water inside, outside your home or in the shed or garage over the winter. If you use the hose over the winter disconnect it and remove all water before coiling it up again.
Is your snow blower tuned up and ready to go? Do you need to replace any snow shovels before they are all gone?
Have you called the oil company about your winter tune-up?
Might I Recommend
Winter is a great time to prune deciduous trees and shrubs in CT landscapes. If your landscape needs pruning call today!
Now is the time to begin planning your landscape design if you are thinking about landscaping next year. Spring comes fast. Now is the time to start the design.
Need firewood? We have a limited supply available so don’t wait to call.
If you have any questions about your CT Landscape please post them below.